1. : Mazda SST number
2. : Global SST number
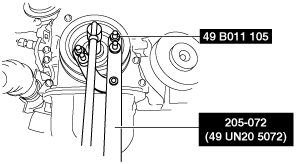
1: 49 UN20 5072
2: 205–072
Holder
1: 49 B011 105
2: –
Adapter

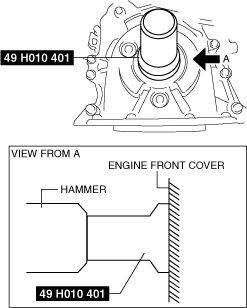
1: 49 H010 401
2: –
Oil seal installer

FRONT OIL SEAL REPLACEMENT [SKYACTIV-G 2.5T]
id0110q8800800
Special Service Tool (SST)
|
1. : Mazda SST number
2. : Global SST number
|
|||||
|
1: 49 UN20 5072
2: 205–072
Holder
|
|
1: 49 B011 105
2: –
Adapter
|
|
1: 49 H010 401
2: –
Oil seal installer
|
|
1. Remove the front under cover No.2. (See FRONT UNDER COVER No.2 REMOVAL/INSTALLATION.)
2. Remove the front splash shield (RH). (See FRONT SPLASH SHIELD REMOVAL/INSTALLATION.)
3. Remove the drive belt. (See DRIVE BELT REMOVAL/INSTALLATION [SKYACTIV-G 2.5T].)
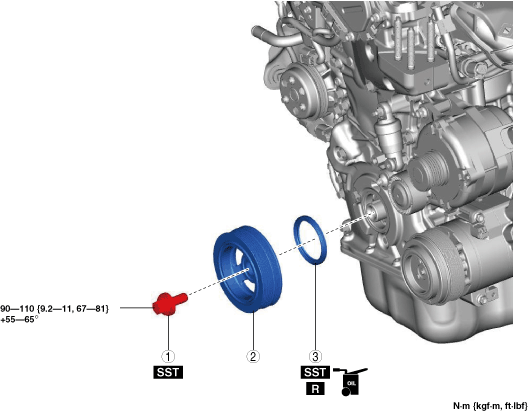
4. Remove in the order indicated in the table.
5. Install in the reverse order of removal.
ac9uuw00006422
|
|
1
|
Crankshaft pulley lock bolt
|
|
2
|
Crankshaft pulley
|
|
3
|
Front oil seal
(See Front Oil Seal Removal Note.)
|
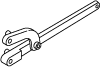
Crankshaft Pulley Lock Bolt Removal Note
1. Install the SST to the crankshaft pulley, and lock the crankshaft against rotation.
ac5uuw00000501
|
2. Remove the crankshaft pulley lock bolt.
Front Oil Seal Removal Note
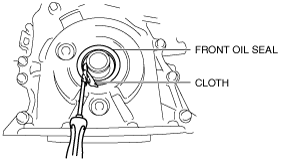
1. Cut the oil seal lip using a utility knife.
2. Remove the oil seal using a flathead screwdriver with the tip protected by a clean cloth to prevent damage to the oil seal sliding part of the crankshaft.
am6xuw00006600
|
Front Oil Seal Installation Note
1. Apply clean engine oil to the inner surface of a new front oil seal.
2. Insert the front oil seal into the engine front cover by hand.
3. Tap the oil seal in evenly using the SST and a hammer.
ac9uuw00006423
|
am6xuw00006601
|
Crankshaft Pulley Lock Bolt Installation Note
1. Install the SST on the crankshaft pulley to lock the crankshaft against rotation.
ac5uuw00000502
|
2. Tighten the crankshaft pulley lock bolt in the order shown in the following two steps.