 |
ac9wzw00005880
FRONT SHOCK ABSORBER INSPECTION
id021300800800
1. Remove the wheel and tire. (See WHEEL AND TIRE REMOVAL/INSTALLATION.)
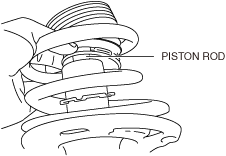
2. Inspect the front shock absorber for damage.
3. Push up the dust boot to the point where the piston rod is visible as shown in the figure.
ac9wzw00005880
|
4. Inspect the front shock absorber for oil leakage and if there is any malfunction, replace the front shock absorber. (See FRONT SHOCK ABSORBER AND COIL SPRING REMOVAL/INSTALLATION.) (See FRONT SHOCK ABSORBER AND COIL SPRING DISASSEMBLY/ASSEMBLY.)
|
SYMPTOM |
DETAIL |
ACTION |
|---|---|---|
 |
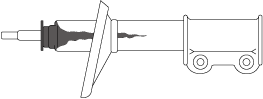
OIL STAIN ON UPPER PART OF FRONT SHOCK ABSORBER
• Oil stain is above the spring seat as shown in the figure.
|
Wipe off any dust or oil on the surface.
|
 |
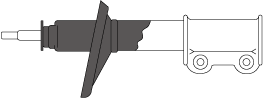
OIL LEAKAGE RUNS DOWN IN STRIP
• Oil is running down in a strip past the spring seat along the side of the front shock absorber as shown in the figure.
|
Replace the front shock absorber. (See FRONT SHOCK ABSORBER AND COIL SPRING REMOVAL/INSTALLATION.) (See FRONT SHOCK ABSORBER AND COIL SPRING DISASSEMBLY/ASSEMBLY.)
|
 |
OIL LEAKAGE FROM SPRING SEAT BOTTOM TO LOWER PART OF FRONT SHOCK ABSORBER
• Oil is running down in a band past the spring seat along the side of the front shock absorber as shown in the figure.
|
5. Remove the front shock absorber. (See FRONT SHOCK ABSORBER AND COIL SPRING REMOVAL/INSTALLATION.) (See FRONT SHOCK ABSORBER AND COIL SPRING DISASSEMBLY/ASSEMBLY.)
6. Expand and contract the front shock absorber piston rod 3 times or more at a certain speed and after the 4th time verify that the weight in a full stroke is constant with no abnormal response and noise.