REAR STABILIZER CONTROL LINK INSPECTION


id021400800300

1.  Remove the rear stabilizer control link. (See REAR STABILIZER REMOVAL [2WD].) (See REAR STABILIZER INSTALLATION [2WD].) (See REAR STABILIZER REMOVAL [4WD].) (See REAR STABILIZER INSTALLATION [4WD].)

2.  Inspect the rear stabilizer control link for bends or damage.

•  If there is any malfunction, replace the rear stabilizer control link. (See REAR STABILIZER REMOVAL [2WD].) (See REAR STABILIZER INSTALLATION [2WD].) (See REAR STABILIZER REMOVAL [4WD].) (See REAR STABILIZER INSTALLATION [4WD].)

3.  Rotate the rear stabilizer control link ball joint stud 10 times and shake it side to side 10 times.

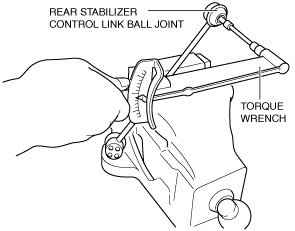
4.  Install a hexagonal wrench to the rear stabilizer control link ball joint stud, and measure the starting torque of the rear stabilizer control link ball joint using a torque wrench.

ac9wzw00003486
Rear stabilizer control link ball joint starting torque
0.8—3.5 N·m {8.2—35 kgf·cm, 7.1—30 in·lbf}
•  If not within the specification, replace the rear stabilizer control link. (See REAR STABILIZER REMOVAL [2WD].) (See REAR STABILIZER INSTALLATION [2WD].) (See REAR STABILIZER REMOVAL [4WD].) (See REAR STABILIZER INSTALLATION [4WD].)
•  Even when within the specification, if there is excessive play in the rear stabilizer control link ball joint, replace the rear stabilizer control link. (See REAR STABILIZER REMOVAL [2WD].) (See REAR STABILIZER INSTALLATION [2WD].) (See REAR STABILIZER REMOVAL [4WD].) (See REAR STABILIZER INSTALLATION [4WD].)