 |
REAR LATERAL LINK REMOVAL/INSTALLATION
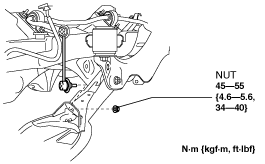
id021400801200
1. Remove the wheel and tire. (See WHEEL AND TIRE REMOVAL/INSTALLATION.)
2. Disconnect the rear stabilizer control link from the rear lower arm.
ac9uuw00007982
|
3. Remove the protector. (See Protector Installation Note.)
ac9uuw00007983
|
4. Remove in the order indicated in the table.
5. Install in the reverse order of removal. (See Suspension Links Installation Note.)
6. When replacing the rear lateral link, inspect the wheel alignment and adjust it if necessary. (See REAR WHEEL ALIGNMENT.)
ac9uuw00007984
|
|
1
|
Rear lateral link outer bolt
|
|
2
|
Rear lateral link inner bolt
|
|
3
|
Rear lateral link
|
Rear Lateral Link Outer Bolt Removal Note
1. Jack up the vehicle to the unloaded condition, and support the rear trailing link component using a jack.
ac5wzw00004601
|
2. Remove the rear lateral link outer bolt.
Suspension Links Installation Note
1. When installing the joint sections with rubber bushings, perform the following procedures.
Rear Lateral Link Installation Note
1. Install the rear lateral link so that the rear lateral link outer bolt can be inserted from the front of the vehicle.
2. Install the rear lateral link inner bolt.
3. Jack up the vehicle to the unloaded condition, and support the rear trailing link component using a jack.
ac5wzw00004601
|
4. Install the rear lateral link outer bolt.
Protector Installation Note
1. Insert the protector positioning pin into the rear lateral link.
ac9uuw00007985
|
2. Tighten the bolts to the specified torque.
3. Install the fasteners.