REAR SHOCK ABSORBER INSPECTION


id021400801400

1.  Remove the wheel and tire. (See WHEEL AND TIRE REMOVAL/INSTALLATION.)

2.  Remove the rear shock absorber. (See REAR SHOCK ABSORBER REMOVAL/INSTALLATION.)

3.  Inspect the rear shock absorber for damage.

•  If there is any malfunction, replace the rear shock absorber. (See REAR SHOCK ABSORBER REMOVAL/INSTALLATION.)

4.  Inspect the rear shock absorber for oil leakage and if there is any malfunction, replace the rear shock absorber. (See REAR SHOCK ABSORBER REMOVAL/INSTALLATION.)

Caution
•  Even if there is no oil leakage, there may be gas leakage or internal part damage. Gas leakage and internal part damage cause a lowered vehicle height, unstable vehicle movement, or abnormal noise. Perform the stroke inspection and verify that there is no malfunction.

SYMPTOM

DETAIL

ACTION

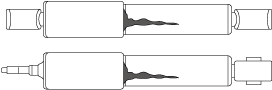
OIL STAIN BELOW DUST BOOT
•  Oil stain is below the dust boot as shown in the figure.
•  The oil stain area is 1/3 of L or less.
Note
•  The oil stain is not progressive because the area dampens and dries repeatedly.
•  The damping function is operating normally.
Wipe off any dust or oil on the surface.
OIL LEAKAGE RUNS DOWN IN STRIP
•  Oil is running down in a strip along the side of the rear shock absorber as shown in the figure.
Replace the rear shock absorber. (See REAR SHOCK ABSORBER REMOVAL/INSTALLATION.).)
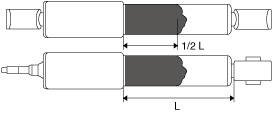
OIL LEAKAGE BELOW DUST BOOT
•  The oil leakage area is 1/2 of L or more as shown in the figure.

5.  Expand and contract the rear shock absorber piston rod 3 times or more at a certain speed and after the 4th time verify that the weight in a full stroke is constant with no abnormal response and noise.

•  If there is any malfunction, replace the rear shock absorber. (See REAR SHOCK ABSORBER REMOVAL/INSTALLATION.)