 |
ac9uuw00009427
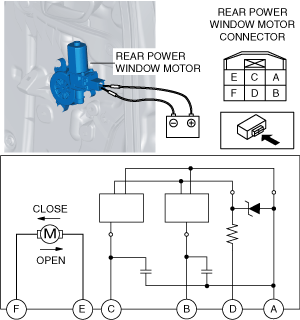
REAR POWER WINDOW MOTOR INSPECTION
id091200001900
Auto-open/close Function for Driver-side
1. Disconnect the negative battery terminal. (See NEGATIVE BATTERY TERMINAL DISCONNECTION/CONNECTION.)
2. Remove the rear door trim. (See REAR DOOR TRIM REMOVAL/INSTALLATION.)
3. Disconnect the front power window motor connector.
4. Apply battery positive voltage and connect the ground to front power window motor terminals E and F, and then inspect the front power window motor operation.
|
B+ Terminal
|
Ground Terminal
|
Operation
|
|
E
|
F
|
Close
|
|
F
|
E
|
Open
|
ac9uuw00009427
|
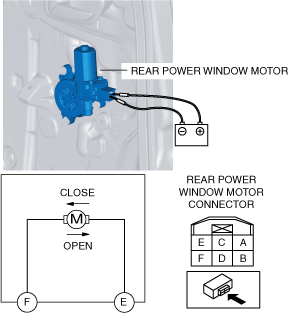
Auto-open/close Function For All Windows
1. Disconnect the negative battery terminal. (See NEGATIVE BATTERY TERMINAL DISCONNECTION/CONNECTION.)
2. Remove the power window subswitch. (See POWER WINDOW SUBSWITCH REMOVAL/INSTALLATION.)
3. Remove the rear door trim. (See REAR DOOR TRIM REMOVAL/INSTALLATION.)
4. Disconnect the front power window motor connector.
5. Apply battery positive voltage and connect the ground to front power window motor terminals E and F, and then inspect the front power window motor operation.
|
B+ Terminal
|
Ground Terminal
|
Operation
|
|
E
|
F
|
Close
|
|
F
|
E
|
Open
|
ac9uuw00009399
|
6. Connect the rear power window motor connector.
7. Connect the power window subswitch connector. (See POWER WINDOW SUBSWITCH REMOVAL/INSTALLATION.)
8. Connect the negative battery terminal. (See NEGATIVE BATTERY TERMINAL DISCONNECTION/CONNECTION.)
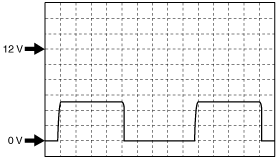
9. Operate the front power window motor and verify the wave patterns for terminals B and C.
am3uuw00010937
|