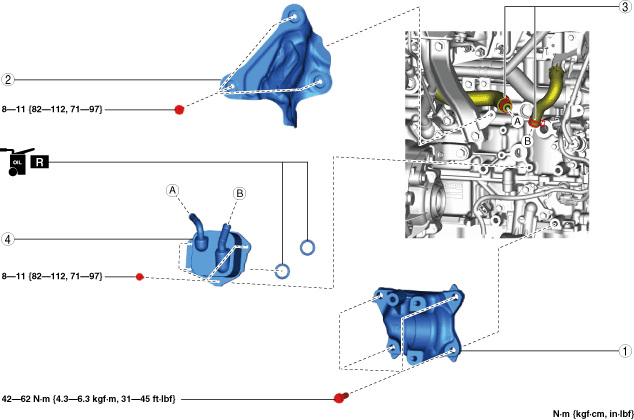
 |
OIL COOLER REMOVAL/INSTALLATION [SKYACTIV-G 2.5T]
id0111q8800800
1. Disconnect the negative battery terminal. (See NEGATIVE BATTERY TERMINAL DISCONNECTION/CONNECTION.)
2. Remove the front under cover No.2. (See FRONT UNDER COVER No.2 REMOVAL/INSTALLATION.)
3. Drain the engine coolant. (See ENGINE COOLANT REPLACEMENT [SKYACTIV-G 2.5T].)
4. Remove the front crossmember component. (2WD (R.H.D.)) (4WD) (See FRONT CROSSMEMBER REMOVAL/INSTALLATION.)
5. Remove the WU-TWC. (See EXHAUST SYSTEM REMOVAL/INSTALLATION [SKYACTIV-G 2.5T].)
6. Remove the front drive shaft (RH). (See FRONT DRIVE SHAFT REMOVAL/INSTALLATION.)
7. Remove in the order indicated in the table.
8. Use a clean cloth to wipe off the mounting surface on the cylinder block and the oil cooler.
9. Install in the reverse order of the removal.
10. Refill the engine coolant. (See ENGINE COOLANT REPLACEMENT [SKYACTIV-G 2.5T].)
11. Start the engine and confirm that there is no oil leakage.
12. Inspect the oil level. (See ENGINE OIL LEVEL INSPECTION [SKYACTIV-G 2.5T].)
13. Inspect for engine coolant leakage. (See ENGINE COOLANT LEAKAGE INSPECTION [SKYACTIV-G 2.5T].)
ac9uuw00008418
|
|
1
|
Bracket No.1 (front drive shaft (RH))
|
|
2
|
Oil pipe protector
|
|
3
|
Water hose
|
|
4
|
Oil cooler
(See Oil Cooler Installation Note.)
|
Oil Cooler Installation Note
1. Completely remove any oil, dirt, or other foreign matter from the oil cooler seating surface and the oil cooler bolts.
2. Install new O-rings to the oil cooler.
ac9uuw00006419
|
3. Temporarily tighten the oil cooler bolts until they are seated.
4. Tighten the bolts in the order shown in the figure.
ac9uuw00006420
|
5. Tighten the bolts in the order shown in the figure again.
ac9uuw00006420
|
Bracket No.1 Installation Note
1. Temporarily tighten the bracket No.1 bolts.
2. Tighten the bolts in the order shown in the figure.
ac9uuw00006421
|