 |
ac5uuw00010869
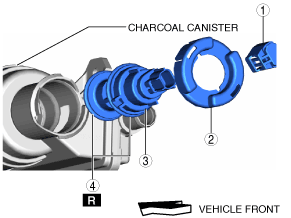
CANISTER VENT (CV) SOLENOID VALVE REMOVAL/INSTALLATION [SKYACTIV-G 2.5T]
id0116q4832100
Taiwan
1. Disconnect the negative battery terminal. (See NEGATIVE BATTERY TERMINAL DISCONNECTION/CONNECTION.)
2. Remove the floor under cover No.2 (LH). (See FLOOR UNDER COVER REMOVAL/INSTALLATION.)
3. Remove the floor under cover No.1 (LH). (See FLOOR UNDER COVER REMOVAL/INSTALLATION.)
4. Disconnect the evaporative hose No.2. (See CHARCOAL CANISTER REMOVAL/INSTALLATION [SKYACTIV-G 2.5T].)
5. Remove in the order indicated in the table.
6. Install in the reverse order of removal.
ac5uuw00010869
|
|
1
|
CV solenoid valve connector
|
|
2
|
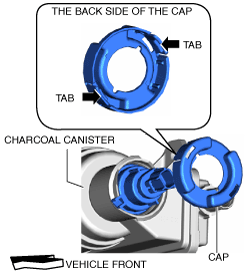
Cap
(See Cap Removal Note.)
(See Cap Installation Note.)
|
|
3
|
CV solenoid valve
|
|
4
|
O-ring
|
Cap Removal Note
ac5uuw00010870
|
1. Unclip tabs then pull out the cap.
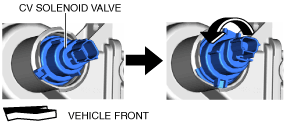
CV Solenoid Valve Removal Note
1. Turn the CV solenoid valve counter-clockwise.
ac5uuw00010871
|
2. Pull the CV solenoid valve straight out to remove.
ac5uuw00010872
|
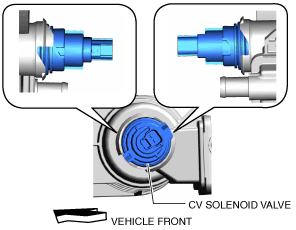
CV Solenoid Valve Installation Note
ac5uuw00010873
|
1. Insert the CV solenoid valve as shown in the figure.
2. Press in the CV solenoid valve to be seated.
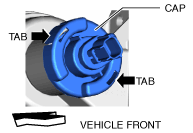
Cap Installation Note
1. Line up notch in the cap with notch on the CV solenoid valve.
ac5uuw00010874
|
2. Press the cap until tabs click into place on the charcoal canister.
ac5uuw00010875
|