 |
ac9wzw00005527
STARTER REMOVAL/INSTALLATION [SKYACTIV-G 2.5T]
id0119q6800200
Operation After Replacing Starter (With i-stop)
Vehicle Identification Number (VIN): JM0 TC*WLA*# 100001—300000, JM6 TC*WLA*# 100001—300000, JM5 TCAWY**# 100001—300000, JM7 TC*WLA*# 100001—300000, JMZ TB*WYA*# 100001—500000, JM7 TCAWY**# 100001—
|
Step |
Action |
|---|---|
|
1
|
Switch the ignition ON (engine off).
|
|
2
|
Apply the parking brake firmly.
|
|
3
|
Shift the selector lever to the N position.
|
|
4
|
Perform the following work with the brake pedal depressed.
1. Depress and release the accelerator pedal 6 times.
2. Verify that the i-stop indicator light (green) flashes.
3. Depress and release the accelerator pedal 6 times.
4. Verify that the i-stop indicator light (green) changes from flashing to illumination.
|
|
5
|
Long-press the i-stop OFF switch.
Wait until the i-stop indicator light (green) turns off (for 5 s or more).
• If the light does not turn off, switch the ignition off and repeat the procedure from Step 1.
|
|
6
|
Switch the ignition off.
|
|
7
|
Start the engine.
|
|
8
|
Verify that the i-stop warning light (amber) turns off.
• If the light does not turn off, switch the ignition off and repeat the procedure from Step 1.
|
|
9
|
Switch the ignition off and disconnect the negative battery terminal. (See NEGATIVE BATTERY TERMINAL DISCONNECTION/CONNECTION.)
|
|
10
|
Verifying battery condition initialization setting (i-stop setting). (See BATTERY CONDITION INITIALIZATION SETTING (i-stop SETTING).)
|
Vehicle Identification Number (VIN): JM0 TC*WLA*# 300001—, JM6 TC*WLA*# 300001—, JM5 TCAWY**# 300001—, JM7 TC*WLA*# 300001—, JMZ TB*WYA*# 600001—
|
Step |
Action |
|---|---|
|
1
|
Switch the ignition ON (engine off).
|
|
2
|
Apply the parking brake firmly.
|
|
3
|
Shift the selector lever to the N position.
|
|
4
|
Depress and release the accelerator pedal 12 times with the brake pedal depressed.
|
|
5
|
Long-press the i-stop OFF switch (for 5 s or more).
|
|
6
|
Switch the ignition off.
|
|
7
|
Start the engine.
|
|
8
|
Verify that the i-stop warning light (amber) turns off.
• If the light does not turn off, switch the ignition off and repeat the procedure from Step 1.
|
|
9
|
Switch the ignition off and disconnect the negative battery terminal. (See NEGATIVE BATTERY TERMINAL DISCONNECTION/CONNECTION.)
|
|
10
|
Verifying battery condition initialization setting (i-stop setting). (See BATTERY CONDITION INITIALIZATION SETTING (i-stop SETTING).)
|
Starter Removal/Installation
1. Disconnect the negative battery terminal. (See NEGATIVE BATTERY TERMINAL DISCONNECTION/CONNECTION.)
2. Remove the air cleaner, air hose and fresh-air duct component. (See INTAKE-AIR SYSTEM REMOVAL/INSTALLATION [SKYACTIV-G 2.5T].)
3. Remove the front under cover No.2. (See FRONT UNDER COVER No.2 REMOVAL/INSTALLATION.)
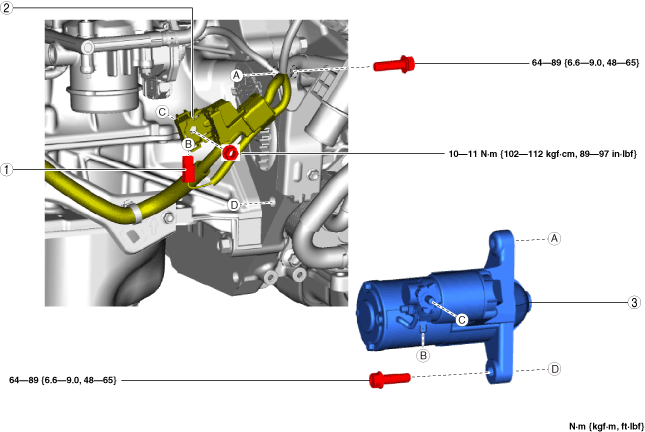
4. Remove in the order indicated in the table.
5. Install in the reverse order of removal.
ac9wzw00005527
|
|
1
|
Terminal S connector
|
|
2
|
Terminal B cable
|
|
3
|
Starter
(See Starter removal note.)
(See Starter installation note.)
|
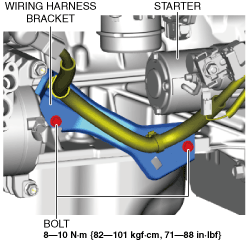
Terminal B cable disconnection note
1. Remove the two bolts shown in the figure. (Without i-ELOOP)
ac9uuw00006566
|
2. Set aside the wiring harness and wiring harness bracket as a single unit. (Without i-ELOOP)
3. Disconnect the terminal B cable.
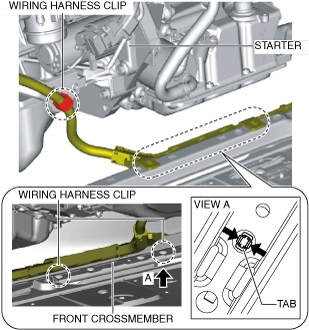
Starter removal note
1. Remove the starter upper bolt from the vehicle upper side.
2. Remove the wiring harness clips shown in the figure. (With i-ELOOP)
ac9wzw00003804
|
3. Remove the starter lower bolt and starter from the vehicle lower side.
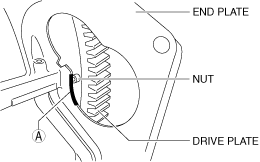
Starter installation note
ac5ccw00000247
|