4WD CONTROL MODULE REMOVAL/INSTALLATION
id031800699400
-
Caution
-
• When performing configuration, it is necessary to read the coupling component calibration data from the 4WD control module before replacing it. Connect the M-MDS to the vehicle and perform vehicle identification before removing the 4WD control module. The coupling component calibration data is temporarily stored in the M-MDS.
• If the configuration was not performed after replacing with a new 4WD control module, the following conditions can be considered as occurring because the coupling component calibration data was not recorded in the 4WD control module.
-
? System does not operate normally
? Problem with coupling component durability may occur
-
Note
-
• The 4WD control module prior to replacement stores the coupling component calibration data.
1. When replacing the 4WD control module, perform the configuration. (See 4WD CONTROL MODULE CONFIGURATION.)
2. Disconnect the negative battery terminal. (See NEGATIVE BATTERY TERMINAL DISCONNECTION/CONNECTION.)
3. Remove the front scuff plate (RH). (See FRONT SCUFF PLATE REMOVAL/INSTALLATION.)
4. Remove the front side trim (RH). (See FRONT SIDE TRIM REMOVAL/INSTALLATION.)
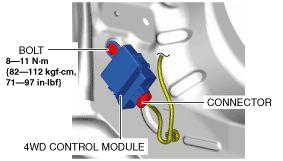
5. Disconnect the connector.
6. Remove the bolt.
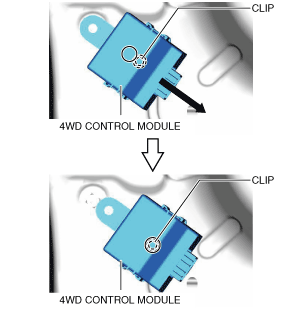
7. Slide the 4WD control module toward the connector, and detach the clip.
8. Remove the 4WD control module.
9. Install in the reverse order of removal.
-
Note
-