 |
ac9uuw00006450
THERMOSTAT REMOVAL/INSTALLATION [SKYACTIV-G 2.5T]
id0112q5801200
1. Disconnect the negative battery terminal. (See NEGATIVE BATTERY TERMINAL DISCONNECTION/CONNECTION.)
2. Drain the engine coolant. (See ENGINE COOLANT REPLACEMENT [SKYACTIV-G 2.5T].)
3. Remove the plug hole plate. (See PLUG HOLE PLATE REMOVAL/INSTALLATION [SKYACTIV-G 2.5T].)
4. Remove the air cleaner, air hose and fresh-air duct component. (See INTAKE-AIR SYSTEM REMOVAL/INSTALLATION [SKYACTIV-G 2.5T].)
5. Remove the battery and battery tray. (See BATTERY REMOVAL/INSTALLATION.)
6. Remove the air inlet pipe. (See INTAKE-AIR SYSTEM REMOVAL/INSTALLATION [SKYACTIV-G 2.5T].)
7. Disconnect the turbocharger air outlet pipe component from the turbocharger side and set it aside. (See INTAKE-AIR SYSTEM REMOVAL/INSTALLATION [SKYACTIV-G 2.5T].)
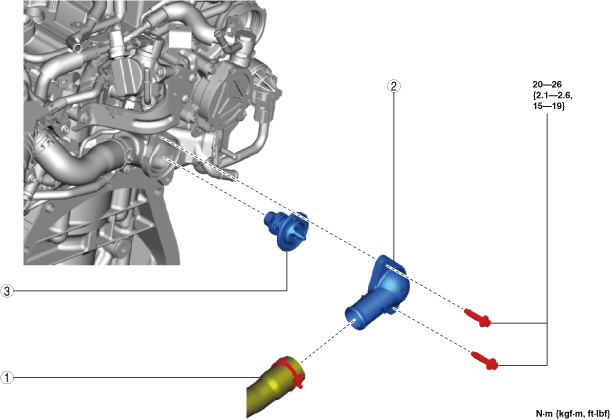
8. Remove in the order indicated in the table.
9. Install in the reverse order of removal.
10. Refill the engine coolant. (See ENGINE COOLANT REPLACEMENT [SKYACTIV-G 2.5T].)
11. Inspect for engine coolant leakage. (See ENGINE COOLANT LEAKAGE INSPECTION [SKYACTIV-G 2.5T].)
ac9uuw00006450
|
|
1
|
Lower radiator hose (Thermostat cover side)
|
|
2
|
Thermostat cover
|
|
3
|
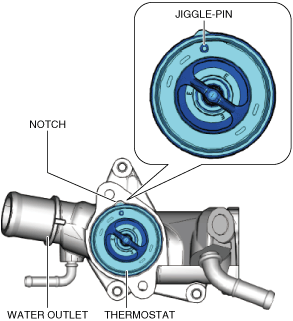
Thermostat
(See Thermostat Installation Note.)
|
Thermostat Cover Removal Note
1. Place the cloth on the transaxle case around the area under the thermostat cover.
2. Slightly loosen the two thermostat cover bolts and use the cloth to absorb the draining engine coolant.
3. After the engine coolant stops draining, remove the thermostat cover.
Thermostat Installation Note
1. Install the thermostat with the jiggle pin aligned with the notch of the water outlet.
ac9uuw00006451
|