INSTRUMENT CLUSTER REMOVAL/INSTALLATION
id092200010300
-
Caution
-
• If configuration is not performed when the instrument cluster is replaced with a new one, the vehicle specification information is not stored in the instrument cluster and the system will not operate normally.
• When performing configuration, it is necessary to read the vehicle specification information from the instrument cluster before replacing it. Connect the M-MDS to the vehicle and perform vehicle identification before removing the instrument cluster. The vehicle specification information is temporarily stored in the M-MDS.
-
Note
-
• The instrument cluster prior to replacement stores the vehicle specification information.
• A new instrument cluster does not store any vehicle specification information.
• If the vehicle specification information from the instrument cluster prior to replacement cannot be read, perform the configuration using As-Built data.
1. When replacing the instrument cluster, perform the configuration. (See INSTRUMENT CLUSTER CONFIGURATION (USING READ/WRITE FUNCTION).)
-
Note
-
2. Disconnect the negative battery terminal. (See NEGATIVE BATTERY TERMINAL DISCONNECTION/CONNECTION.)
3. Remove the following parts:
- (1) Glove compartment (See GLOVE COMPARTMENT REMOVAL/INSTALLATION.)
-
- (2) Passenger-side decoration panel (See DECORATION PANEL REMOVAL/INSTALLATION.)
-
- (3) Upper column cover (See COLUMN COVER REMOVAL/INSTALLATION.)
-
- (4) Meter hood No.1 (See METER HOOD REMOVAL/INSTALLATION.)
-
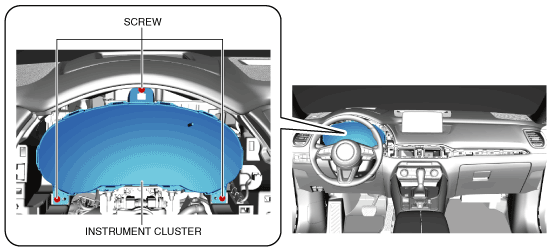
4. Remove the screws.
-
Caution
-
• When removing the instrument cluster, the instrument cluster may contact the light switch, wiper switch, or the start stop unit and the instrument cluster may be scratched. When removing the instrument cluster, cover the light switch, wiper switch, and start stop unit using a rag.
5. Cover the light switch, wiper and washer switch, and start stop unit using a rag to prevent scratches.
6. Pull the instrument cluster outward to detach it from the dashboard pins.
7. Rotate the instrument cluster in the direction of the arrow shown in the figure.
8. Disconnect the connectors.
9. Rotate the clip approx. 90 degrees, pull it in the direction shown by the arrow in the figure, and disengage the clip tabs from the instrument cluster.
-
Caution
-
• If the instrument cluster is left for a long time with its screen facing down, grease applied to the needles may spill and the needles may not operate smoothly. When storing the instrument cluster, store it with its screen facing upward.
10. Remove the instrument cluster by sliding it between the dashboard and the steering.
11. Install in the reverse order of removal.
-
Note
-
12. After performing the configuration (writing), switch the ignition ON (engine off or on) and verify that the instrument cluster operates normally.
-
• If [Fctry] or [Factory] is indicated on the traveled distance display, perform the following procedure to clear the indication.
-
1. Remove the ROOM fuse.
2. Switch the ignition ON (engine off) while touching the center of the push button start with the upper part of the remote transmitter.
3. Switch the ignition OFF.
4. Install the ROOM fuse.
5. Switch the ignition ON (engine off) and verify that indication is cleared.
Instrument Cluster Installation Note
1. Install the screws in the order of (1), (2), and (3).
