WINDSHIELD REMOVAL
id091200000500
-
Warning
-
• Using piano wire with bare hands can cause injury. Always wear gloves when using piano wire.
Reusing Windshield
1. Disconnect the negative battery terminal. (See NEGATIVE BATTERY TERMINAL DISCONNECTION/CONNECTION.)
2. Remove the following parts:
- (1) Windshield wiper arm and blade (See WINDSHIELD WIPER ARM AND BLADE REMOVAL/INSTALLATION.)
-
- (2) Cowl grille (See COWL GRILLE REMOVAL/INSTALLATION.)
-
- (3) Front fender molding (See FRONT FENDER MOLDING REMOVAL/INSTALLATION.)
-
- (4) A-pillar trim (See A-PILLAR TRIM REMOVAL/INSTALLATION.)
-
- (5) Sunvisor (See SUNVISOR REMOVAL/INSTALLATION.)
-
- (6) Front map light (See FRONT MAP LIGHT REMOVAL/INSTALLATION.)
-
- (7) Assist handle (See ASSIST HANDLE REMOVAL/INSTALLATION.)
-
- (8) Sensor cover (See SENSOR COVER REMOVAL/INSTALLATION.)
-
- (9) Forward sensing camera (FSC) (with forward sensing camera (FSC)) (See FORWARD SENSING CAMERA (FSC) REMOVAL/INSTALLATION.)
-
- (10) Forward sensing camera (FSC) cover (with forward sensing camera (FSC)) (See FORWARD SENSING CAMERA (FSC) COVER REMOVAL/INSTALLATION.)
-
- (11) Forward sensing camera (FSC) clip (with forward sensing camera (FSC)) (See FORWARD SENSING CAMERA (FSC) CLIP REMOVAL/INSTALLATION.)
-
- (12) Forward sensing camera (FSC) Short-cord (with forward sensing camera (FSC)) (See FORWARD SENSING CAMERA (FSC) SHORT-CORD REMOVAL/INSTALLATION.)
-
- (13) Rain sensor (with auto light/wiper system) (See RAIN SENSOR REMOVAL/INSTALLATION.)
-
- (14) Laser sensor (with laser sensor) (See LASER SENSOR REMOVAL/INSTALLATION.)
-
- (15) Rearview mirror (without auto-dimming rearview mirror) (See REARVIEW MIRROR REMOVAL/INSTALLATION.)
-
- (16) Auto-dimming rearview mirror (with auto-dimming rearview mirror) (See AUTO-DIMMING REARVIEW MIRROR REMOVAL/INSTALLATION.)
-
3. Set the headliner out of the way.
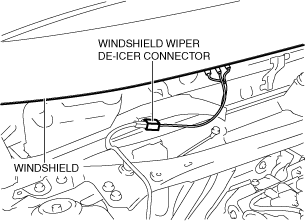
4. Disconnect the windshield wiper de-icer connector. (with windshield wiper de-icer)
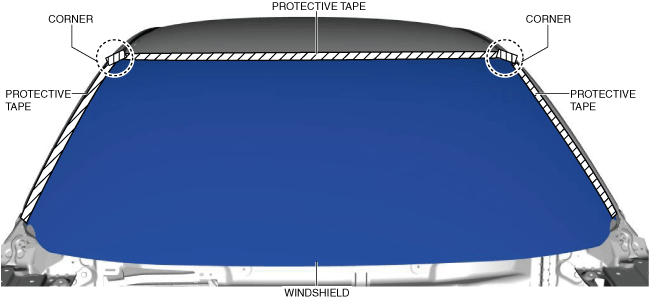
5. Apply protective tape along the edge of the body.
-
Note
-
• Overlap and adhere the protective tape to the corners to prevent damage.
6. Remove the windshield molding by pulling it outward.
-
Note
-
• If the windshield molding is difficult to remove, warm the windshield molding using a heat gun.
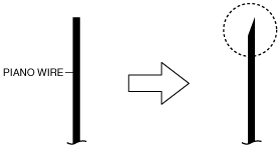
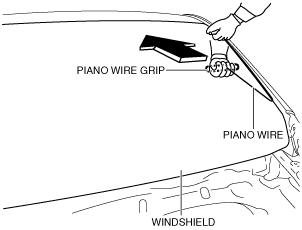
7. Cut the tip of the piano wire diagonally to facilitate insertion of the piano wire through the sealant.
8. Pass the piano wire through from the cabin side.
-
Caution
-
• Carefully pass the piano wire so as not to damage the body. If the piano wire contacts the body, the paint may be damaged.
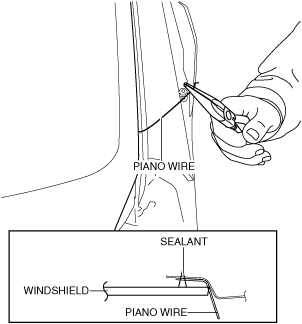
9. Install the piano wire to the piano wire grip.
10. Secure the piano wire on the outer side, and pull the wire on the cabin side in the direction of the arrow shown in the figure to cut the windshield sealant.
-
Note
-
• Use a long sawing action to spread the work over the whole length of piano wire to prevent it from breaking due to localized heating.
11. When reaching the pin, pull the piano wire out to go around the pin, then pass the piano wire through from the cabin side again.
12. Secure one end of piano wire, and while pulling the other end, cut the sealant around the windshield.
13. Pinch the pin from the inside of the vehicle and detach it.
-
Note
-
• Before removing the windshield from the body, mark the windshield by affixing tape to the windshield and body panel.
14. Remove the windshield.
15. If the pin is damaged, remove the pin.
-
Note
-
• Before removing the pin from the windshield glass, place an alignment mark on the windshield.
Not Reusing Windshield
1. Disconnect the negative battery terminal. (See NEGATIVE BATTERY TERMINAL DISCONNECTION/CONNECTION.)
2. Remove the following parts:
- (1) Windshield wiper arm and blade (See WINDSHIELD WIPER ARM AND BLADE REMOVAL/INSTALLATION.)
-
- (2) Cowl grille (See COWL GRILLE REMOVAL/INSTALLATION.)
-
- (3) Front fender molding (See FRONT FENDER MOLDING REMOVAL/INSTALLATION.)
-
- (4) A-pillar trim (See A-PILLAR TRIM REMOVAL/INSTALLATION.)
-
- (5) Sunvisor (See SUNVISOR REMOVAL/INSTALLATION.)
-
- (6) Front map light (See FRONT MAP LIGHT REMOVAL/INSTALLATION.)
-
- (7) Assist handle (See ASSIST HANDLE REMOVAL/INSTALLATION.)
-
- (8) Sensor cover (See SENSOR COVER REMOVAL/INSTALLATION.)
-
- (9) Forward sensing camera (FSC) (with forward sensing camera (FSC)) (See FORWARD SENSING CAMERA (FSC) REMOVAL/INSTALLATION.)
-
- (10) Forward sensing camera (FSC) cover (with forward sensing camera (FSC)) (See FORWARD SENSING CAMERA (FSC) COVER REMOVAL/INSTALLATION.)
-
- (11) Forward sensing camera (FSC) clip (with forward sensing camera (FSC)) (See FORWARD SENSING CAMERA (FSC) CLIP REMOVAL/INSTALLATION.)
-
- (12) Forward sensing camera (FSC) Short-cord (with forward sensing camera (FSC)) (See FORWARD SENSING CAMERA (FSC) SHORT-CORD REMOVAL/INSTALLATION.)
-
- (13) Rain sensor (with auto light/wiper system) (See RAIN SENSOR REMOVAL/INSTALLATION.)
-
- (14) Laser sensor (with laser sensor) (See LASER SENSOR REMOVAL/INSTALLATION.)
-
- (15) Rearview mirror (without auto-dimming rearview mirror) (See REARVIEW MIRROR REMOVAL/INSTALLATION.)
-
- (16) Auto-dimming rearview mirror (with auto-dimming rearview mirror) (See AUTO-DIMMING REARVIEW MIRROR REMOVAL/INSTALLATION.)
-
3. Set the headliner out of the way.
4. Disconnect the windshield wiper de-icer connector. (with windshield wiper de-icer)
5. Apply protective tape along the edge of the body.
-
Note
-
• Overlap and adhere the protective tape to the corners to prevent damage.
6. Remove the windshield molding by pulling it outward.
-
Note
-
• If the windshield molding is difficult to remove, warm the windshield molding using a heat gun.
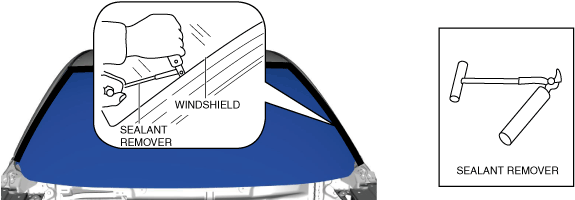
7. Cut out the sealant all around the glass using a sealant remover.
-
Note
-
• If it is difficult to cut sealant, use piano wire and follow the procedure under “Reusing Windshield”.
8. Remove the windshield.