ACTIVE DRIVING DISPLAY REMOVAL/INSTALLATION
id092200103700
1. Disconnect the negative battery terminal. (See NEGATIVE BATTERY TERMINAL DISCONNECTION/CONNECTION.)
2. Remove the following parts:
- (1) Glove compartment (See GLOVE COMPARTMENT REMOVAL/INSTALLATION.)
-
- (2) Passenger-side decoration panel (See DECORATION PANEL REMOVAL/INSTALLATION.)
-
- (3) Upper column cover (See COLUMN COVER REMOVAL/INSTALLATION.)
-
- (4) Meter hood No.1 (See METER HOOD REMOVAL/INSTALLATION.)
-
- (5) Instrument cluster (See INSTRUMENT CLUSTER REMOVAL/INSTALLATION.)
-
- (6) Global positioning system (GPS) antenna (See GLOBAL POSITIONING SYSTEM (GPS) ANTENNA REMOVAL/INSTALLATION.)
-
- (7) Meter hood No.2 (See METER HOOD REMOVAL/INSTALLATION.)
-
3. Disconnect the connector.
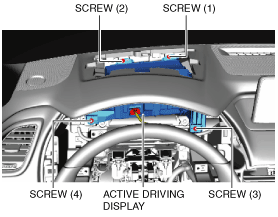
4. Remove the screws.
-
Caution
-
• When removing the active driving display, the active driving display may contact the light switch, wiper switch, or the start stop unit and the active driving display may be scratched. When removing the active driving display, cover the light switch, wiper and washer switch, and start stop unit using a rag.
• When removing the active driving display, it contacts the part A shown in the figure which may scratch or damage the active driving display. When removing the active driving display, wrap the part A shown in the figure with cloth.
5. To prevent scratches or damage, cover the light switch, wiper and washer switch, and the start stop unit with cloth, and wrap the part A shown in the figure with cloth.
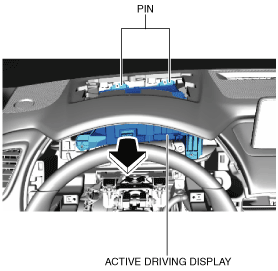
6. Pull the active driving display outward to detach it from the dashboard pins.
-
Caution
-
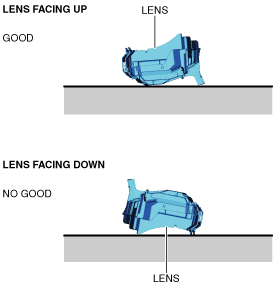
• When storing the active driving display, store it with its lens facing upward.
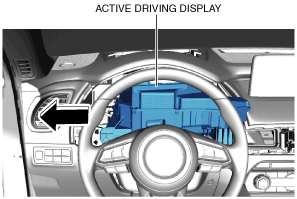
7. Remove the active driving display by sliding it between the dashboard and the steering.
8. Install in the reverse order of removal.
Active Driving Display Installation Note
1. Install the screws in the order of (1), (2), (3), and (4).