 |
ac9uuw00007909
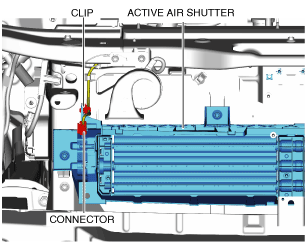
ACTIVE AIR SHUTTER REMOVAL/INSTALLATION
id092300000500
1. Disconnect the negative battery terminal. (See NEGATIVE BATTERY TERMINAL DISCONNECTION/CONNECTION.)
2. Remove the seal board upper. (See SEAL BOARD UPPER REMOVAL/INSTALLATION.)
3. Remove the front bumper. (See FRONT BUMPER REMOVAL.) (See FRONT BUMPER INSTALLATION.)
4. Remove the set plate. (See SET PLATE REMOVAL/INSTALLATION.)
5. Remove the radar unit. (See RADAR UNIT REMOVAL/INSTALLATION.)
6. Remove the ambient temperature sensor. (See AMBIENT TEMPERATURE SENSOR REMOVAL/INSTALLATION.)
7. Disconnect the connector.
ac9uuw00007909
|
8. Remove the clip.
9. Remove the bolts.
ac9uuw00007910
|
10. Press the tabs in the direction of arrow (1) shown in the figure and detach the tabs from the shroud panel.
ac9uuw00007911
|
11. Remove the active air shutter in the direction of arrow (2) shown in the figure.
12. Install in the reverse order of removal.

