DTC B1011:95 [SAS CONTROL MODULE]
id0802g6823100
System malfunction location |
• SAS control module connectors are poorly connected
|
---|---|
Detection condition
|
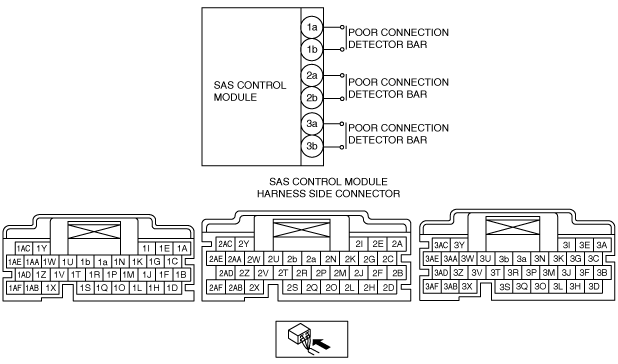
• No continuity between poor connection detector bar terminals of the SAS control module
|
Fail-safe
|
Not applicable
|
Possible cause
|
• SAS control module connectors are poorly connected
• SAS control module connector malfunction
• SAS control module malfunction
|
Diagnostic Procedure
Step |
Inspection |
Action |
|
---|---|---|---|
1
|
PERFORM MALFUNCTION DIAGNOSIS USING FLOWCHART
• Is the malfunction diagnosis performed using the flowchart? (See FLOWCHART [SAS CONTROL MODULE].)
|
Yes
|
Go to the next step.
|
No
|
Re-perform the malfunction diagnosis using the flowchart. (See FLOWCHART [SAS CONTROL MODULE].)
|
||
2
|
INSPECT SAS CONTROL MODULE CONNECTORS CONNECTION CONDITION
• Switch the ignition off.
• Disconnect the negative battery terminal and wait for 1 min or more. (See NEGATIVE BATTERY TERMINAL DISCONNECTION/CONNECTION.)
• Remove the column cover. (See COLUMN COVER REMOVAL/INSTALLATION.)
• Disconnect the clock spring connector. (See CLOCK SPRING REMOVAL/INSTALLATION.)
• Remove the glove compartment. (See GLOVE COMPARTMENT REMOVAL/INSTALLATION.)
• Disconnect the passenger-side air bag module connector. (See PASSENGER-SIDE AIR BAG MODULE REMOVAL/INSTALLATION.)
• Disconnect the driver and passenger-side front seat connectors. (See FRONT SEAT REMOVAL/INSTALLATION.)
• Remove the headliner. (See HEADLINER REMOVAL/INSTALLATION.)
• Disconnect the driver and passenger-side curtain air bag module connectors. (See CURTAIN AIR BAG MODULE REMOVAL/INSTALLATION.)
• Remove the B-pillar lower trim. (See B-PILLAR LOWER TRIM REMOVAL/INSTALLATION.)
• Disconnect the driver and passenger-side front pre-tensioner seat belt connectors. (See FRONT SEAT BELT REMOVAL/INSTALLATION.)
• Remove the trunk side trim. (See TRUNK SIDE TRIM REMOVAL/INSTALLATION.)
• Disconnect the driver and passenger-side rear pre-tensioner seat belt connectors. (See SECOND-ROW SEAT BELT REMOVAL/INSTALLATION.)
• Remove the selector lever component. (See AUTOMATIC TRANSAXLE SHIFT MECHANISM REMOVAL/INSTALLATION.)
• Are all SAS control module connectors securely connected?
|
Yes
|
Go to the next step.
|
No
|
Reconnect the SAS control module connectors properly.
Go to Step 4.
|
||
3
|
VERIFY POOR CONNECTION DETECTOR BAR OF SAS CONTROL MODULE CONNECTOR
• Disconnect the all SAS control module connectors. (See SAS CONTROL MODULE REMOVAL/INSTALLATION.)
• Verify the condition of the detector bars of the SAS control module connectors. (Corrosion, damage, and disconnected pins)
• Are the detector bars of the SAS control module connectors normal?
|
Yes
|
Go to the next step.
|
No
|
Replace the air bag wiring harness, then go to the next step.
|
||
4
|
PERFORM DTC INSPECTION FOR SAS CONTROL MODULE
• Connect the SAS control module connectors.
• Reconnect all disconnected connectors.
• Connect the negative battery terminal. (See NEGATIVE BATTERY TERMINAL DISCONNECTION/CONNECTION.)
• Switch the ignition ON (engine off or on).
• Clear the DTC for the SAS control module using the M-MDS. (See CLEARING DTC [SAS CONTROL MODULE].)
• Perform the DTC inspection for the SAS control module using the M-MDS. (See DTC INSPECTION [SAS CONTROL MODULE].)
• Is the same DTC displayed?
|
Yes
|
Repeat the inspection from Step 1.
• Replace the SAS control module. (See SAS CONTROL MODULE REMOVAL/INSTALLATION.)
|
No
|
DTC troubleshooting completed.
|