SECOND-ROW SEAT BELT REMOVAL/INSTALLATION
id081100802500
-
Caution
-
• If the retractor is disassembled, the second-row seat belt will not pull out or retract correctly due to looseness and excessive play. Therefore, do not disassemble the retractor.
Without Rear Pre-tensioner Seat Belt
1. Switch the ignition to off.
2. Disconnect the negative battery terminal and wait for 1 min or more. (See NEGATIVE BATTERY TERMINAL DISCONNECTION/CONNECTION.)
3. Remove the following parts:
- (1) Trunk covering (See TRUNK COVERING REMOVAL/INSTALLATION.)
-
- (2) Trunk board (See TRUNK BOARD REMOVAL/INSTALLATION.)
-
- (3) Trunk side pocket (See TRUNK SIDE POCKET REMOVAL/INSTALLATION.)
-
- (4) Trunk end trim (See TRUNK END TRIM REMOVAL/INSTALLATION.)
-
- (5) Rear scuff plate (See REAR SCUFF PLATE REMOVAL/INSTALLATION.)
-
- (6) Third-row seat cushion (See THIRD-ROW SEAT CUSHION REMOVAL/INSTALLATION.)
-
- (7) Third-row seat back component (See THIRD-ROW SEAT BACK COMPONENT REMOVAL/INSTALLATION.)
-
- (8) Trunk side trim (See TRUNK SIDE TRIM REMOVAL/INSTALLATION.)
-
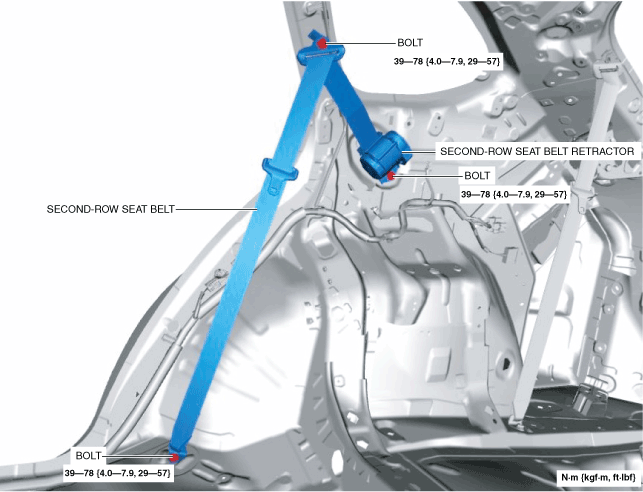
4. Remove the bolts.
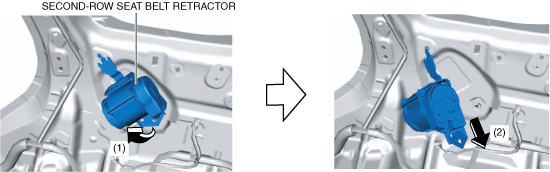
5. Move the second-row seat belt retractor in the order of arrows (1) and (2) shown in the figure, and remove it from the body.
6. Remove the second-row seat belt.
7. Install in the reverse order of removal.
With Rear Pre-tensioner Seat Belt
1. Switch the ignition to off.
2. Disconnect the negative battery terminal and wait for 1 min or more. (See NEGATIVE BATTERY TERMINAL DISCONNECTION/CONNECTION.)
3. Remove the following parts:
- (1) Trunk covering (See TRUNK COVERING REMOVAL/INSTALLATION.)
-
- (2) Trunk board (See TRUNK BOARD REMOVAL/INSTALLATION.)
-
- (3) Trunk side pocket (See TRUNK SIDE POCKET REMOVAL/INSTALLATION.)
-
- (4) Trunk end trim (See TRUNK END TRIM REMOVAL/INSTALLATION.)
-
- (5) Rear scuff plate (See REAR SCUFF PLATE REMOVAL/INSTALLATION.)
-
- (6) Third-row seat cushion (See THIRD-ROW SEAT CUSHION REMOVAL/INSTALLATION.)
-
- (7) Third-row seat back component (See THIRD-ROW SEAT BACK COMPONENT REMOVAL/INSTALLATION.)
-
- (8) Trunk side trim (See TRUNK SIDE TRIM REMOVAL/INSTALLATION.)
-
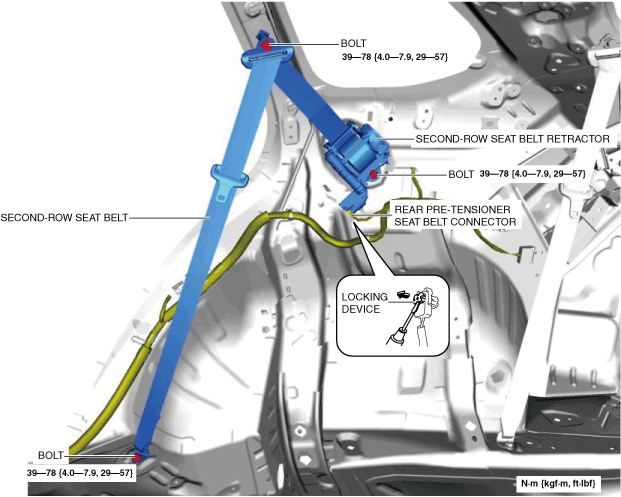
4. Using a flathead screwdriver, lift the rear pre-tensioner seat belt connector locking device carefully, however do not remove it.
5. Disconnect the rear pre-tensioner seat belt connector.
6. Remove the bolts.
7. Move the second-row seat belt retractor in the order of arrows (1) and (2) shown in the figure, and remove it from the body.
8. Remove the second-row seat belt.
9. Install in the reverse order of removal.
10. Switch the ignition ON (engine off or on).
11. Verify that the air bag/seat belt pre-tensioner system warning light illuminates for approx. 6 s and turns off.
-
• If the air bag/seat belt pre-tensioner system warning light does not operate normally, refer to the on-board diagnostic system (air bag system) and perform inspection of the system. (See
FLOWCHART [SAS CONTROL MODULE].)