REAR ACCESSORY SOCKET INSPECTION
id092100901000
1. Disconnect the negative battery terminal. (See NEGATIVE BATTERY TERMINAL DISCONNECTION/CONNECTION.)
2. Remove the following parts:
- (1) Trunk covering (See TRUNK COVERING REMOVAL/INSTALLATION.)
-
- (2) Trunk board (See TRUNK BOARD REMOVAL/INSTALLATION.)
-
- (3) Trunk side pocket (See TRUNK SIDE POCKET REMOVAL/INSTALLATION.)
-
- (4) Trunk end trim (See TRUNK END TRIM REMOVAL/INSTALLATION.)
-
- (5) Rear scuff plate (See REAR SCUFF PLATE REMOVAL/INSTALLATION.)
-
- (6) Third-row seat cushion (See THIRD-ROW SEAT CUSHION REMOVAL/INSTALLATION.)
-
- (7) Third-row seat back component (See THIRD-ROW SEAT BACK COMPONENT REMOVAL/INSTALLATION.)
-
- (8) Trunk side trim (RH) (See TRUNK SIDE TRIM REMOVAL/INSTALLATION.)
-
- (9) Rear accessory socket (See REAR ACCESSORY SOCKET REMOVAL/INSTALLATION.)
-
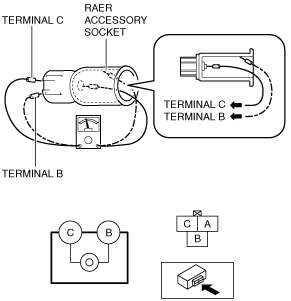
3. Connect the tester probe to the position shown in the figure and verify that there is continuity.
-