 |
ac9wzw00004067
MAZDA ERA-GLONASS CONTROL MODULE REMOVAL/INSTALLATION
id092200666000
1. When replacing the Mazda ERA-GLONASS control module, perform the following procedure.
2. Disconnect the negative battery terminal. (See NEGATIVE BATTERY TERMINAL DISCONNECTION/CONNECTION.)
3. Remove the following parts:
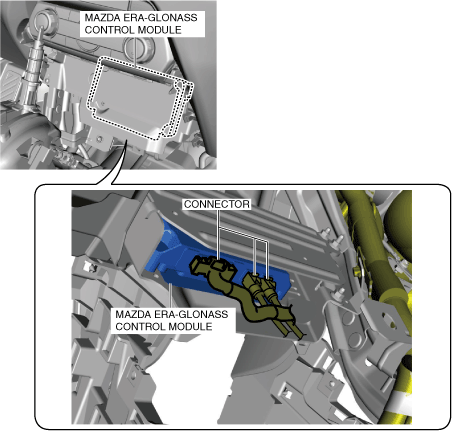
4. Disconnect the connectors.
ac9wzw00004067
|
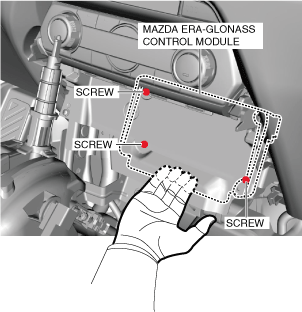
5. Remove the screws while supporting the Mazda ERA-GLONASS control module with your hand so that it does not fall.
ac9wzw00005067
|
6. Remove the Mazda ERA-GLONASS control module in the direction of arrow shown in the figure.
ac9wzw00004069
|
7. Install in the reverse order of removal. (See Mazda ERA-GLONASS control module installation note.)
8. When replacing the Mazda ERA-GLONASS control module, perform the procedure according to the directions on the M-MDS screen.
9. When the Mazda ERA-GLONASS control module is replaced, perform the Mazda ERA-GLONASS control module finalization procedure.(See MAZDA ERA-GLONASS CONTROL MODULE FINALIZATION PROCEDURE.)
Mazda ERA-GLONASS control module installation note
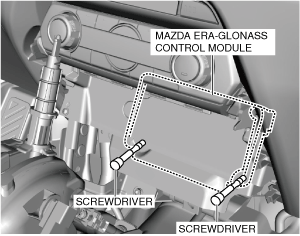
1. Insert two screwdrivers into the Mazda ERA-GLONASS control module installation holes shown in the figure to locate the installation positions of the screws.
ac9wzw00004079
|