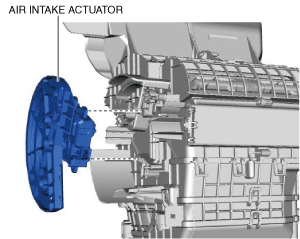
AIR INTAKE ACTUATOR REMOVAL
id074000840100
L.H.D.
1. Set the air intake mode to RECIRCULATE.
2. Disconnect the negative battery terminal. (See NEGATIVE BATTERY TERMINAL DISCONNECTION/CONNECTION.)
3. Remove the following parts:
- (1) Selector lever knob (See AUTOMATIC TRANSAXLE SHIFT MECHANISM REMOVAL/INSTALLATION.)
-
- (2) Shift panel (See SHIFT PANEL REMOVAL/INSTALLATION.)
-
- (3) Console side panel (See CONSOLE SIDE PANEL REMOVAL/INSTALLATION.)
-
- (4) Front console (See FRONT CONSOLE REMOVAL/INSTALLATION.)
-
- (5) Glove compartment (See GLOVE COMPARTMENT REMOVAL/INSTALLATION.)
-
- (6) Dashboard under cover (See DASHBOARD UNDER COVER REMOVAL/INSTALLATION.)
-
- (7) Passenger-side decoration panel (See DECORATION PANEL REMOVAL/INSTALLATION.)
-
- (8) Front scuff plate (See FRONT SCUFF PLATE REMOVAL/INSTALLATION.)
-
- (9) Front side trim (See FRONT SIDE TRIM REMOVAL/INSTALLATION.)
-
- (10) Bonnet release lever (See BONNET RELEASE LEVER AND RELEASE CABLE REMOVAL/INSTALLATION.)
-
- (11) Fuel-filler lid opener lever (See FUEL-FILLER LID OPENER AND LEVER REMOVAL/INSTALLATION.)
-
- (12) Driver-side lower panel (See DRIVER-SIDE LOWER PANEL REMOVAL/INSTALLATION.)
-
- (13) Passenger-side lower panel (See PASSENGER-SIDE LOWER PANEL REMOVAL/INSTALLATION.)
-
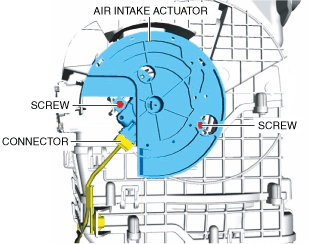
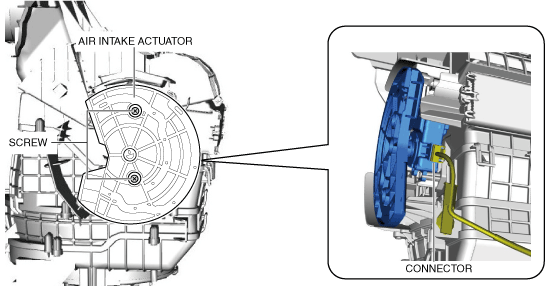
4. Disconnect the connector.
5. Remove the screws.
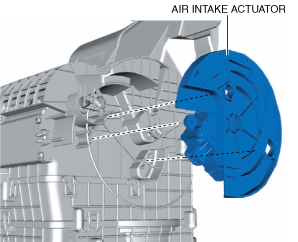
6. Remove the air intake actuator.
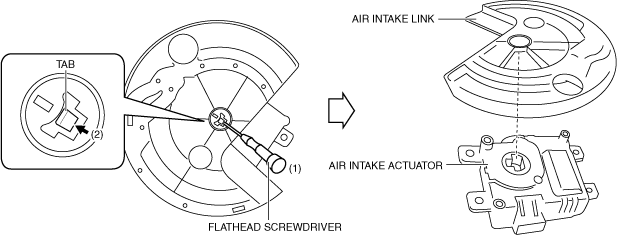
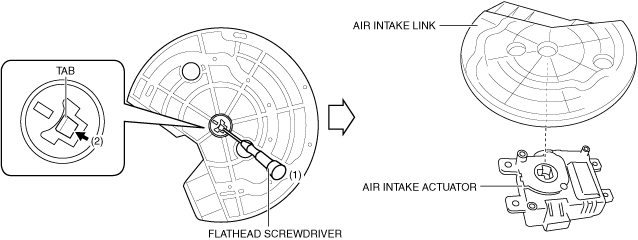
7. Insert a flathead screwdriver in the position shown in the figure (1).
8. Remove the air intake link while pressing the tab in the directions of arrow (2) shown in the figure.
R.H.D.
1. Set the air intake mode to RECIRCULATE.
2. Disconnect the negative battery terminal. (See NEGATIVE BATTERY TERMINAL DISCONNECTION/CONNECTION.)
3. Remove the following parts:
- (1) Selector lever knob (See AUTOMATIC TRANSAXLE SHIFT MECHANISM REMOVAL/INSTALLATION.)
-
- (2) Shift panel (See SHIFT PANEL REMOVAL/INSTALLATION.)
-
- (3) Console side panel (See CONSOLE SIDE PANEL REMOVAL/INSTALLATION.)
-
- (4) Front console (See FRONT CONSOLE REMOVAL/INSTALLATION.)
-
- (5) Glove compartment (See GLOVE COMPARTMENT REMOVAL/INSTALLATION.)
-
- (6) Dashboard under cover (See DASHBOARD UNDER COVER REMOVAL/INSTALLATION.)
-
- (7) Passenger-side decoration panel (See DECORATION PANEL REMOVAL/INSTALLATION.)
-
- (8) Front scuff plate (See FRONT SCUFF PLATE REMOVAL/INSTALLATION.)
-
- (9) Front side trim (See FRONT SIDE TRIM REMOVAL/INSTALLATION.)
-
- (10) Bonnet release lever (See BONNET RELEASE LEVER AND RELEASE CABLE REMOVAL/INSTALLATION.)
-
- (11) Fuel-filler lid opener lever (See FUEL-FILLER LID OPENER AND LEVER REMOVAL/INSTALLATION.)
-
- (12) Driver-side lower panel (See DRIVER-SIDE LOWER PANEL REMOVAL/INSTALLATION.)
-
- (13) Passenger-side lower panel (See PASSENGER-SIDE LOWER PANEL REMOVAL/INSTALLATION.)
-
4. Disconnect the connector.
5. Remove the screws.
6. Remove the air intake actuator.
7. Insert a flathead screwdriver in the position shown in the figure (1).
8. Remove the air intake link while pressing the tab in the directions of arrow (2) shown in the figure.