FLOOR COVERING REMOVAL/INSTALLATION
id091700605900
-
Note
-
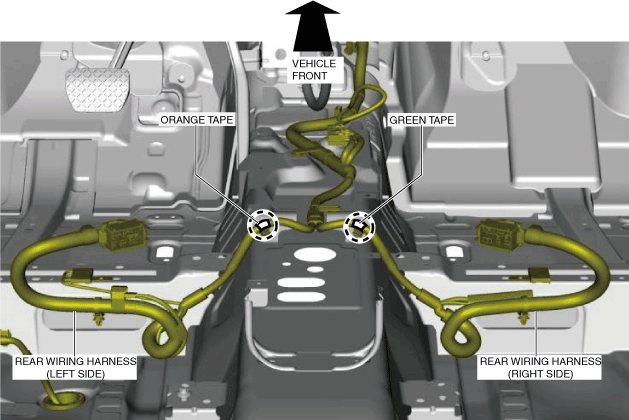
• When replacing the rear wiring harness, position the wiring harness wrapped in orange tape on the left side and the wiring harness wrapped in green tape on the right side to prevent incorrect assembly of the rear wiring harness.
1. Disconnect the negative battery terminal. (See NEGATIVE BATTERY TERMINAL DISCONNECTION/CONNECTION.)
2. Remove the following parts:
- (1) Front seat (See FRONT SEAT REMOVAL/INSTALLATION.)
-
- (2) Second-row seat (See SECOND-ROW SEAT REMOVAL/INSTALLATION.)
-
- (3) Third-row seat cushion (See THIRD-ROW SEAT CUSHION REMOVAL/INSTALLATION.)
-
- (4) Third-row seat back component (See THIRD-ROW SEAT BACK COMPONENT REMOVAL/INSTALLATION.)
-
- (5) Front scuff plate (See FRONT SCUFF PLATE REMOVAL/INSTALLATION.)
-
- (6) Front side trim (See FRONT SIDE TRIM REMOVAL/INSTALLATION.)
-
- (7) Rear scuff plate (See REAR SCUFF PLATE REMOVAL/INSTALLATION.)
-
- (8) B-pillar lower trim (See B-PILLAR LOWER TRIM REMOVAL/INSTALLATION.)
-
- (9) Trunk covering (See TRUNK COVERING REMOVAL/INSTALLATION.)
-
- (10) Trunk board (See TRUNK BOARD REMOVAL/INSTALLATION.)
-
- (11) Trunk side pocket (See TRUNK SIDE POCKET REMOVAL/INSTALLATION.)
-
- (12) Trunk end trim (See TRUNK END TRIM REMOVAL/INSTALLATION.)
-
- (13) Trunk side trim (See TRUNK SIDE TRIM REMOVAL/INSTALLATION.)
-
- (14) Selector lever knob (See AUTOMATIC TRANSAXLE SHIFT MECHANISM REMOVAL/INSTALLATION.)
-
- (15) Shift panel (See SHIFT PANEL REMOVAL/INSTALLATION.)
-
- (16) Console side panel (See CONSOLE SIDE PANEL REMOVAL/INSTALLATION.)
-
- (17) Front console (See FRONT CONSOLE REMOVAL/INSTALLATION.)
-
- (18) Side wall (See SIDE WALL REMOVAL/INSTALLATION.)
-
- (19) Rear console (See REAR CONSOLE REMOVAL/INSTALLATION.)
-
- (20) Audio amplifier (with Bose®) (See AUDIO AMPLIFIER REMOVAL/INSTALLATION.)
-
- (21) Accelerator pedal (See ACCELERATOR PEDAL REMOVAL/INSTALLATION [SKYACTIV-G 2.5T].)
-
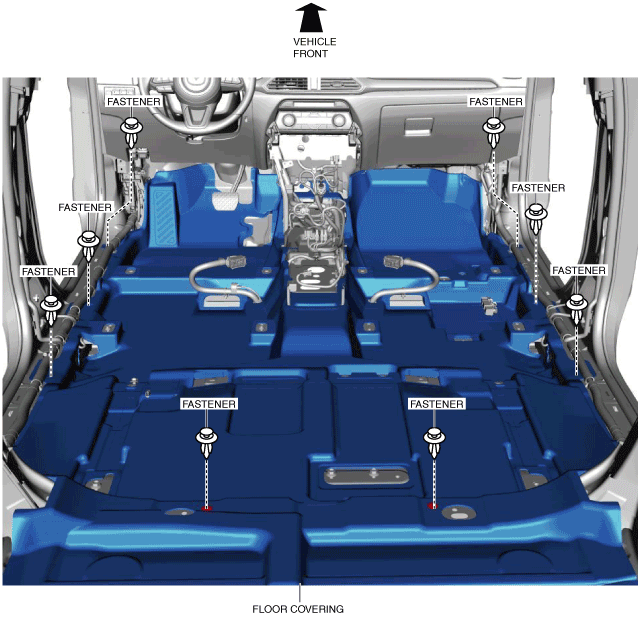
3. Remove the fasteners.
4. Take the floor covering out from the door opening.
5. Install in the reverse order of removal. (See Floor Covering Installation Note.)
Floor Covering Installation Note
-
Caution
-
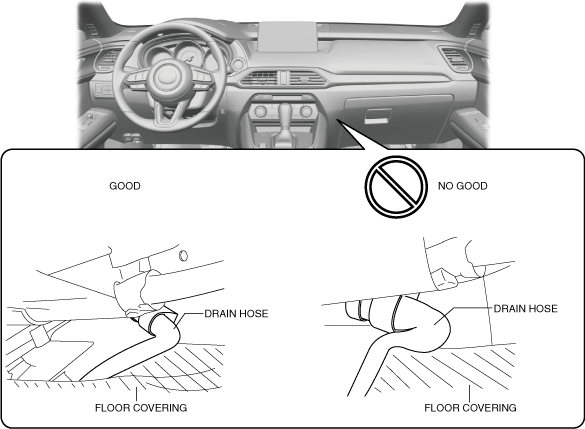
• When installing the floor covering, the floor covering may press the A/C unit drain hose and deform it. When installing the floor covering, align the floor covering to the body to prevent deforming the A/C unit drain hose.
1. Place the floor covering with it aligned to the body.
2. Before installing the side wall, verify that the A/C unit drain hose is not deformed.
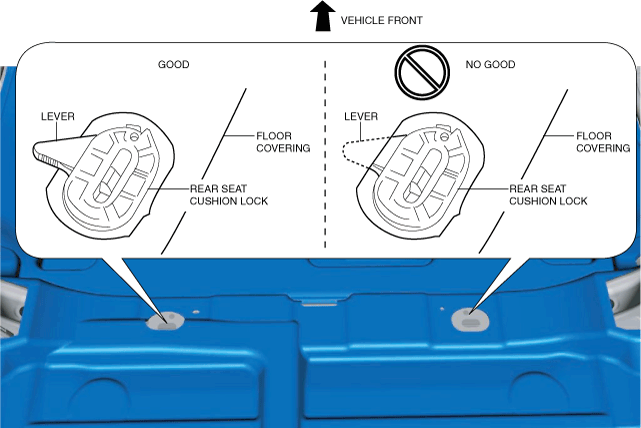
• If the rear seat cushion lock lever is covered by the floor covering, the rear seat cushion lock cannot be released. When installing the floor covering, do not cover the rear seat cushion lock lever with the floor covering.